System Agent Installation
Learn how to install the AutoElevate agent

Written by Owen Parry
Updated at April 12th, 2024
Table of Contents
Note: We recommended that before large-scale deployments, you should first have your ticketing system integration with AutoElevate complete. For limited testing purposes, you can deploy agents manually.
MSI Agent File
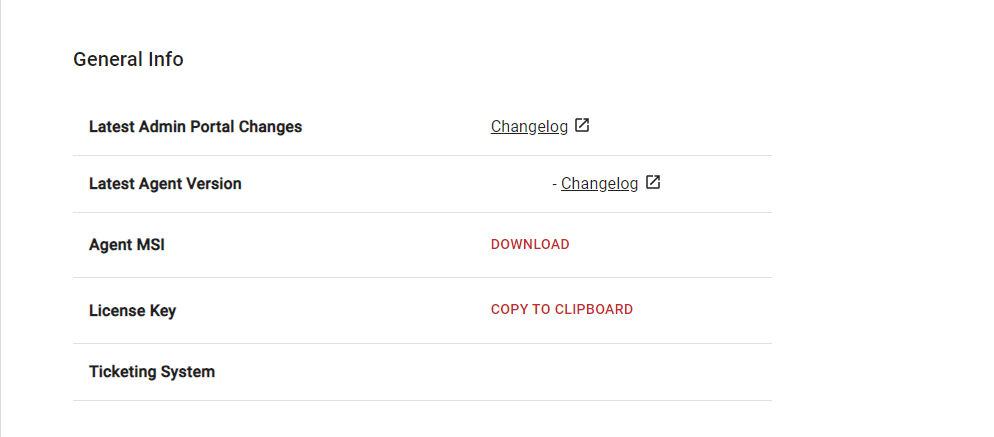
You can download the MSI file, access your license key, and adjust other settings by clicking on the “Settings” tab under General Info -> Agent MSI - Download. See the below image from the settings tab:
Manual Installation
To manually install the System Agent or use another management tool, here's what you’ll need:
- A valid AutoElevate license key should be provided to you upon Trial registration or purchase.
- The latest AEAgent.msi file can be downloaded from your account management page.
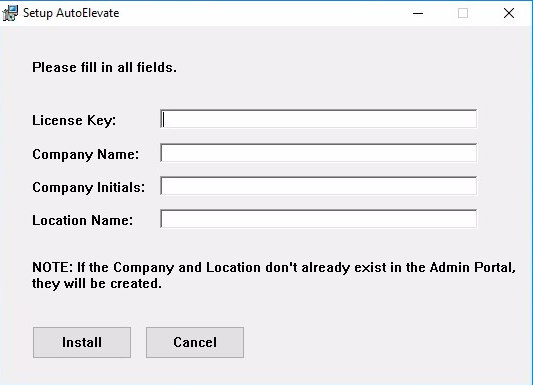
You can install the Agent MSI manually on each machine, allowing you to specify client company names and locations for each installation. Manual installation is especially helpful if you want to deploy a handful of Agents for testing or demonstration purposes. To install manually, you will need to supply the following information during installation:
License Key: Access your license key from the AutoElevate portal by clicking on the “Settings” tab under General Info -> License Key - Copy to Clipboard.
Company Name: Enter a client company name such as “Contoso, Inc.”. If the company name entered here does not exist in the Admin Portal, it will be created automatically.
Company Initials (Optional): Enter two or 3-character initials for the company, which will serve as a quick reference in the Mobile Notification app. So, for Contoso, Inc., you may want to enter CI. If this field is not included, we will automatically generate initials based on the company's name.
Location Name: Enter a location name for the machine to be organized into, such as Laptops, Denver, or Main Office. If the Location doesn’t exist for the company, it will be created automatically.
Avoid Duplicate Companies
When installing machines, consider how they are categorized in the Admin Portal. Unique company/location names create separate companies, while the same name groups machines under one company.
To avoid variations in your installations, consider using MSI deployment options along with a deployment tool (such as ConnectWise Automate, Kaseya, Autotask, SolarWinds, etc.), Group Policy, or a deployment script.
Scripted MSI Deployment
To generate an MSIEXEC command that has all the command line options necessary to install the software, which you then can use with your RMM tool (or other deployment method), you would do the following:
- From the AE Admin Portal, go to the Companies tab
- Create a new Company by clicking the + button at the top of the screen. Enter a Company Name and initials and click save.
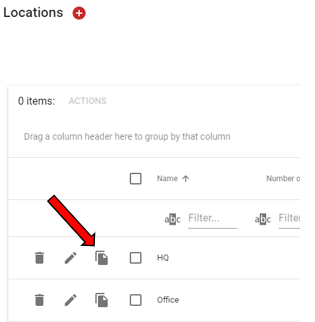
- Create a new Location by clicking the + button, entering a location name (locations are machine groups that can be actual locations or any other criteria like laptops or desktops, and then click save.
- Once the Location has been created, click the icon next to the Location that looks like papers and the system will generate an MSI command and arguments you can use.
To look at the MSI command for a Company that has already been created, do the following:
- From the Admin Portal, go to the Companies tab
- Click the view button (eyeball) next to a Company Name.
- Click the icon next to the Location that looks like papers, and the system will generate an MSI command and arguments that you can use to build a scripted deployment.
Remember that you will need to modify the file path in this MSI command to match wherever you place the MSI file on the machine.
You will see in that command line argument AGENT_MODE, which can be changed to live when you run it so that the agents are forced into Live mode at installation.
You can see that the MSIEXEC command that is generated uses the following common installation options:
/i = sets the MSI to install. The options below must be set for a successful installation.
/uninstall = sets the MSI to uninstall. Uninstallation should be done from add/remove applications but can also be done from the MSI file directly. When done from the MSI, the other AutoElevate specific options below, such as “LICENSE_KEY” do not need to be specified.
/quiet = silent installation with no user interaction.
/lv = log file with verbose output – specify the log file name that should be created.
The following AutoElevate specific options must be set for successful installation (except for the optional "COMPANY_INITIALS"). Use values specific to your needs and practice:
LICENSE_KEY="123456789ABCDEFGYOURLICENSEKEYHERE" – Access your license key from the AutoElevate portal by clicking on the “Settings” tab under General Info -> License Key - Copy to Clipboard.
COMPANY_NAME="Contoso, Inc." – Setting this value categorizes the workstation in the Web Admin Portal by this company name. For best results, match the Company Name to an existing Company Name or reference in your RMM or Ticketing system.
LOCATION_NAME="Main Office" – This should match the Location Name or reference in your RMM or Ticketing system.
AGENT_MODE="live" (optional) – This can be set to live, policy, or audit so that the Agent installer can override the current mode or be set to install in the mode of your choice automatically. Audit mode is the default if this argument is not specified. If the script is performing an upgrade on an agent already installed, this argument will have no effect and the agent will still maintain the agent mode that is currently set. See System Overview - System Agent for details on the different modes.
BLOCKER_MODE="audit" (optional) – This can be set to live, audit, or disabled so that the Agent installer can override the current mode or be set to install in the mode of your choice automatically. Disabled mode is the default if this argument is not specified. If the script is performing an upgrade on an agent already installed, this argument will have no effect and the agent will still maintain the blocker mode that is currently set. See Managing Blocker (Beta) Rules for details on the different modes.
Mode Option
These mode options are case-sensitive and should be in lowercase; otherwise, this command part will fail, and the agent will set to its default mode.
Here is an example of what the installation command might look like (assuming the AESetup.msi file is located in the “C:\Downloads” folder) for a silent unattended installation and to make a log file called AEInstallLog:
msiexec /i C:\Downloads\AESetup.msi /quiet /lv AEInstallLog.log LICENSE_KEY="123456789ABCDEFGYOURLICENSEKEYHERE" COMPANY_NAME="Contoso, Inc." COMPANY_INITIALS="CI" LOCATION_NAME="Main Office" AGENT_MODE="live" BLOCKER_MODE="disabled"Re-running the Installer on an existing installation
If you try to run your script again after a successful installation and attempt to change the settings, the installation will fail because the agent is already installed. To modify the settings of the installed agent, you can do so from the Portal. Alternatively, you can uninstall the agent before redeploying it.
New Companies/Locations Driven By MSI Deployment
To create additional companies, you can use the same MSI command script and change the Company Name, Company Initials, and Location, which, once used on a new workstation, will cause those companies/locations to automatically be set up on the admin portal.
Scripted Un-Installation
Here is an example of what the uninstall command might look like (assuming the AESetup.msi file is located in the “C:\Downloads” folder) for a silent unattended uninstallation and to make a log file called AEUnInstallLog:
msiexec /uninstall C:\Downloads\AESetup.msi /quiet /lv AEInstallLog.logManual Uninstallation
After manually uninstalling the agent, Computers will be removed from the Admin portal after 30 days of not checking in.
After Deployment
Upon successful installation of the AEAgent.msi on the target system, you should have a new service named AutoElevate Agent, which will start as part of the installation and is also set to start automatically at Windows startup. If you check running processes, you should see the AutoElevate Agent process, which is started by the service, as well as the AEAlert and AEUACAgent application processes, which are spawned and monitored to run anytime a user is logged into the system.
If an Agent has not previously been installed on the machine, the AutoElevate Agent will automatically be set to run in Audit mode after installation.
When Audit mode is active, all UAC activity for the user is tracked, but there is no change in the user experience. When Live mode is active, the UAC events are intercepted and replaced by customized AutoElevate dialog boxes.
After onboarding, it is recommended that you run for a period of time in Audit mode to evaluate the current user behavior, system settings, and activity and then make a corresponding plan of action for each client before switching them to Live mode.
Please see our guide on Client Onboarding.